When it comes to constructing or renovating a home, choosing the right door size is crucial for overall functionality and aesthetics. One common door size is the 36-inch door, which is widely used in residential properties. In this article, we will explore everything you need to know about rough openings for 36-inch doors. From understanding the concept of rough openings to the step-by-step guide for creating one, we’ve got you covered.
What is a Rough Opening?
Before we delve into the specifics of a rough opening for a 36-inch door, let’s define what a rough opening actually is. In construction terms, a rough opening refers to the framed opening in a wall where a door, window, or any other opening will be installed. In simple words, it is the required hole size & dimension that provides the necessary space and support for the door, ensuring a seamless fit.
How to Calculate Rough Opening for a 36-inch Door?
Calculating the rough opening for a 36-inch door is a straightforward process. To ensure a proper fit for the door and frame, follow these steps:
- Measure the Door: Take accurate measurements of the width, height, and thickness of the door. For a 36-inch door, the width will be 36 inches.
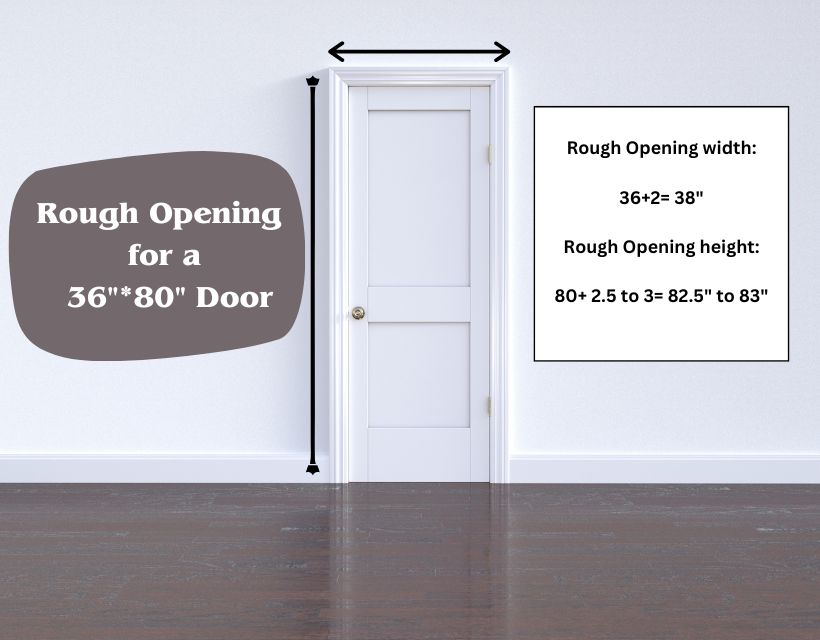
- Add Extra Width: To calculate the rough opening width, add 2 inches to the door width. This additional space allows for the door frame (jamb) and ensures a proper fit. So, the rough opening width will be 38 inches.
- Measure the Height: Measure the height of the door. Standard doors are usually 80 inches tall but double-check to be sure.
- Add Extra Height: Add 2.5 to 3 inches to the door height to calculate the rough opening height. This extra space accommodates the space needed for the door frame and provides some clearance. So, the rough opening height will be around 82.5 to 83 inches.
- Consider Wall Thickness: Take into account the thickness of the walls where the door will be installed. The rough opening should be wide enough to fit the door and frame within the wall.
- Check for Plumb and Level: After constructing the rough opening, ensure that it is plumb (vertically straight) and level (horizontally straight) to ensure the door will hang correctly.
By following these steps and using the measurements obtained, you can create a precise rough opening for your 36-inch door. Remember to double-check all measurements before making any cuts or installations to avoid any errors during the process.
Planning the Rough Opening
- Measuring the Door: The first step in creating a rough opening for a 36-inch door is accurate measurement. Measure the width, height, and depth of the door you intend to install. For a standard 36-inch door, the rough opening width should be 38 inches to allow for the door jamb and shimming.
- Gathering Tools and Materials: Before starting the construction, ensure you have all the necessary tools and materials. This includes a measuring tape, level, hammer, nails, screws, saw, and safety equipment.
- Checking Building Codes: It’s essential to adhere to local building codes and regulations. Check with your local authorities to ensure you are compliant with the required dimensions and safety standards for door openings.
Step-by-Step Guide to Create a Rough Opening
Marking the Opening
- Locating the Center: Identify the center of the wall where you plan to install the door. Measure and mark the centerline on the wall, both vertically and horizontally.
- Adding Extra Space: As mentioned earlier, a 36-inch door requires a rough opening of 38 inches. Mark the points 19 inches on both sides of the centerline to indicate the edges of the rough opening.
Framing the Rough Opening
- Removing Drywall or Sheathing: Carefully remove the drywall or sheathing from the marked area to expose the studs.
- Adding Headers and Jack Studs: Install a header above the door opening to distribute the weight of the wall evenly. Add jack studs on both sides of the opening to support the header.
- Creating the Sill Plate: Install a sill plate at the bottom of the rough opening to provide a base for the door frame.
- Cutting the Opening: Use a saw to cut along the marked lines, creating the rough opening space.
Installing the Door
- Preparing the Door: Before installing the door, ensure it is properly prepped. Remove any packaging, and if it’s a pre-hung door, ensure the door is correctly attached to the frame.
- Placing the Door: Carefully place the door into the rough opening and check for plumb and level. Shim as needed to make adjustments.
- Securing the Door: Once the door is level and properly aligned, secure it in place using nails or screws. Make sure it opens and closes smoothly.
Conclusion
Creating a rough opening for a 36-inch door is an essential part of the construction or renovation process. By following the steps outlined in this guide, you can ensure a properly sized and well-framed door opening that will accommodate your chosen door perfectly.
FAQs
The standard size of a 36-inch door is 36 inches wide and 80 inches tall.
Yes, a 36-inch door can be used for bathrooms, especially for accessible or larger bathrooms.
Permit requirements vary by location, so it’s best to check with your local building department.
Yes, if you have some experience with carpentry and the necessary tools, you can install a 36-inch door yourself.
Yes, 36-inch doors come in various styles, including hinged, sliding, and French doors, among others. Choose one that suits your needs and preferences.