Calculating the rough opening is a critical step in various construction and renovation projects, particularly when installing doors, windows, or other building components. The rough opening refers to the framed opening in a wall or structure where the door or window will be installed.
Why is Rough Opening Crucial?
Proper Fit and Functionality:
A well-calculated rough opening ensures that the door or window fits snugly within the frame. If the opening is too large or too small, it can lead to gaps, drafts, and difficulties in operating the door or window.
Energy Efficiency:
A properly sized rough opening helps maintain the energy efficiency of doors and windows. Gaps or misalignments can result in air leaks, reducing the effectiveness of insulation and causing increased heating or cooling costs.
Structural Integrity:
The rough opening’s dimensions are essential for the structural integrity of the wall. Accurate measurements prevent potential issues like load-bearing problems, weakened walls, or uneven weight distribution.
Compliance with Building Codes:
Building codes often specify the minimum and maximum sizes for rough openings to ensure safety and proper construction. Adhering to these guidelines is essential to pass inspections and comply with regulations.
Aesthetics:
A well-fitted door or window contributes to the overall aesthetics of a building. Properly measured rough openings ensure that the finished product looks clean and professional.
Material Sizing and Ordering:
Knowing the accurate rough opening size allows contractors to order the right-sized doors, windows, or other building components. This minimizes wastage and helps prevent delays in the construction process.
Time and Cost Savings:
Accurate calculations of the rough opening save time and money by reducing the need for adjustments, modifications, or rework during the installation phase.
Safety and Security: A properly sized rough opening ensures that doors and windows can function as intended, providing secure access and exit points in case of emergencies.
What is the Rough Opening for a Door? How to determine it?

The rough opening for a door is the framed opening in a wall where the door will be installed. It includes the space required for the door itself and any necessary clearances for proper installation.
In simple words, a rough opening refers to the specific dimensions or size of the hole needed in a wall to place the door and the frame.
To determine the rough opening size for a door, you need to consider the dimensions of the door and add allowances for shimming, leveling, and the door frame.
The rough opening width for a door is typically calculated as follows:
- Measure the width of the door slab (not including the door frame).
- Add 2 inches (5.08 centimeters) to the door width for shimming and leveling space.
The rough opening height for a door is calculated as follows:
- Measure the height of the door slab (not including the door frame).
- Add 2.5 inches (6.35 centimeters) to the door height for clearance.
For example, if you have a standard interior door that is 30 inches wide and 80 inches tall, the rough opening size would be approximately 32 inches wide (30 + 2 inches) by 82.5 inches tall (80 + 2.5 inches).
It’s important to note that rough opening sizes can vary based on the type of door (interior or exterior), the door frame material, and local building codes. Always check the manufacturer’s recommendations and local building regulations to ensure the correct rough opening size for your specific door installation. Additionally, when installing pre-hung doors, the rough opening size may be slightly different to accommodate the frame and hinges.
Rough opening for a 32 Inch interior door
For a standard 32-inch interior door, the rough opening width and height are calculated as follows:
Rough Opening Width:
- Measure the width of the door slab (not including the door frame) – In this case, it’s 32 inches.
- Add 2 inches (5.08 centimeters) to the door width for shimming and leveling space. 32 inches (door width) + 2 inches (shimming and leveling allowance) = 34 inches
The rough opening width for a 32-inch interior door should be approximately 34 inches.
Rough Opening Height:
- Measure the height of the door slab (not including the door frame) – This measurement typically depends on the standard door height, which is 80 inches for most interior doors.
- Add 2.5 inches (6.35 centimeters) to the door height for clearance. 80 inches (door height) + 2.5 inches (clearance allowance) = 82.5 inches
The rough opening height for a 32-inch interior door should be approximately 82.5 inches.
Rough opening for a 30 Inch door
For a standard 30-inch door, the rough opening width and height are typically as follows:
Rough Opening Width:
- Measure the width of the door slab (not including the door frame) – In this case, it’s 30 inches.
- Add 2 inches (5.08 centimeters) to the door width for shimming and leveling space. 30 inches (door width) + 2 inches (shimming and leveling allowance) = 32 inches
The rough opening width for a 30-inch door should be approximately 32 inches.
Rough Opening Height:
- Measure the height of the door slab (not including the door frame) – This measurement typically depends on the standard door height, which is 80 inches for most interior doors.
- Add 2.5 inches (6.35 centimeters) to the door height for clearance. 80 inches (door height) + 2.5 inches (clearance allowance) = 82.5 inches
The rough opening height for a 30-inch door should be approximately 82.5 inches.
Rough opening for a 36 Inch door:
For a standard 36-inch door rough opening width and height are typically as follows:
Rough Opening Width:
- Measure the width of the door slab (not including the door frame) – In this case, it’s 36 inches.
- Add 2 inches (5.08 centimeters) to the door width for shimming and leveling space. 36 inches (door width) + 2 inches (shimming and leveling allowance) = 38 inches
The rough opening width for a 36-inch door should be approximately 38 inches.
Rough Opening Height:
- Measure the height of the door slab (not including the door frame) – This measurement typically depends on the standard door height, which is 80 inches for most interior doors.
- Add 2.5 inches (6.35 centimeters) to the door height for clearance. 80 inches (door height) + 2.5 inches (clearance allowance) = 82.5 inches
The rough opening height for a 36-inch door should be approximately 82.5 inches.
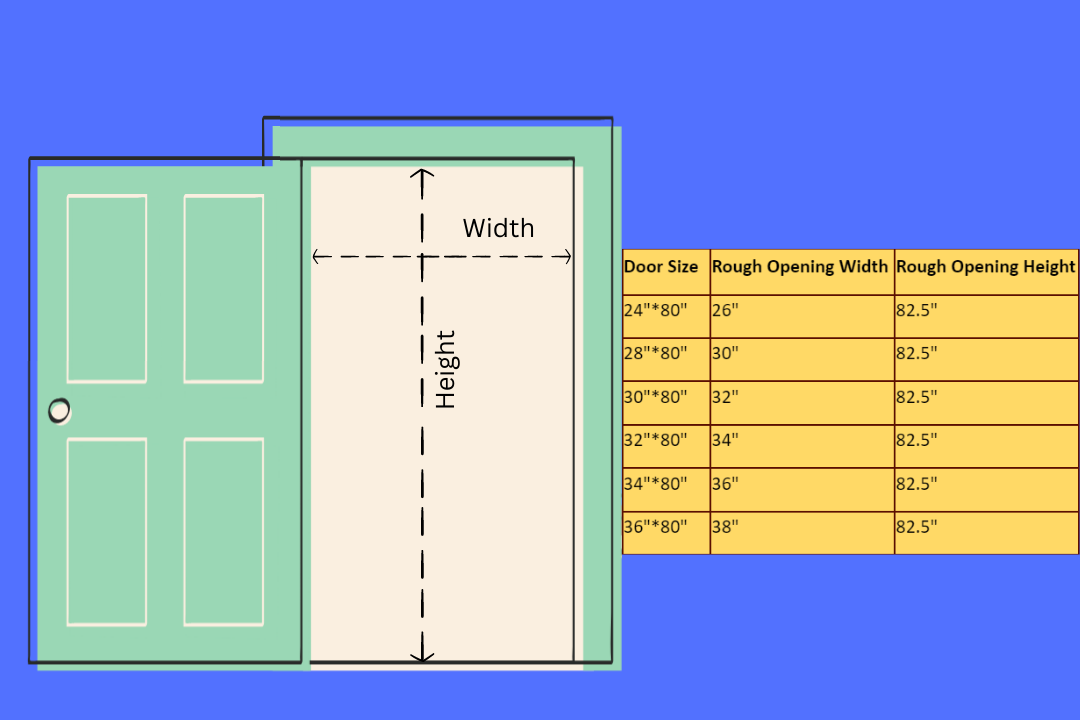
Door Rough Opening Chart for 6 Standard Size Doors 24”, 28”, 30”, 32”, 34” & 36”
Here is a door rough opening chart for six standard-size doors – 24 inches, 28 inches, 30 inches, 32 inches, 34 inches, and 36 inches:
| Door Size (Inches) | Rough Opening Width (Inches) | Rough Opening Height (Inches) |
|---|---|---|
| 24″*80″ | 26″ | 82.5″ |
| 28″*80″ | 30″ | 82.5″ |
| 30″*80″ | 32″ | 82.5″ |
| 32″*80″ | 34″ | 82.5″ |
| 34″*80″ | 36″ | 82.5″ |
| 36″*80″ | 38″ | 82.5″ |
These rough opening dimensions are based on adding the typical shimming and leveling allowances of 2 inches to the door width and 2.5 inches to the door height. The rough opening height of 82.5 inches is based on the standard door height of 80 inches with the additional clearance allowance.
Are the exterior door & interior door rough opening the same?
The rough opening dimensions for exterior doors and interior doors are typically different. Exterior doors and interior doors serve different purposes and have distinct characteristics, which influence the rough opening sizes.
Exterior doors are designed to provide a barrier between the interior of a building and the outside environment. They need to be more robust and weather-resistant than interior doors to withstand various elements. Exterior doors are generally thicker and may have additional features such as weatherstripping and a threshold.
Interior doors, on the other hand, are meant to separate rooms within the building. They do not need the same level of weatherproofing as exterior doors since they are not exposed to outdoor elements. Interior doors are typically thinner and lighter than exterior doors.
As a result of these differences, the rough opening dimensions for exterior doors and interior doors vary:
Rough Opening Width for Exterior Doors:
Typically, the rough opening width for exterior doors is greater than that for interior doors to accommodate the thicker door and any additional weatherproofing components.
Rough Opening Height for Exterior Doors:
The rough opening height for both exterior and interior doors is usually the same, as standard door heights are typically consistent for both types.
Ensuring the Perfect Fit of Your New Door’s Rough Opening
Ensuring a perfect fit for your new door’s rough opening is essential to achieve proper installation, functionality, and aesthetics. Here are some steps to help you achieve the ideal rough opening for your door:
Accurate Measurements:
Measure the width and height of the door slab (not including the frame) carefully. Use a tape measure to get precise dimensions. Double-check your measurements to avoid any errors.
Consider Door Type:
Different door types (interior, exterior, sliding, etc.) may have specific requirements for rough opening dimensions. Ensure you are using the correct guidelines for the type of door you are installing.
Account for Shimming and Leveling:
Add 2 inches to the width and 2.5 inches to the height for shimming and leveling allowances. This extra space will allow you to adjust the door for a perfect fit within the frame.
Check Manufacturer’s Recommendations:
Refer to the door manufacturer’s guidelines for recommended rough opening sizes. Manufacturers often provide specific dimensions based on their door models.
Check Local Building Codes:
Verify local building codes and regulations regarding rough opening sizes for doors. Building codes can vary, and compliance is crucial for safety and legal purposes.
Frame Construction:
Ensure the frame is constructed accurately and securely. Use level and square tools during installation to maintain precise angles and alignments.
Test the Fit:
Before permanently installing the door, place it into the rough opening to check the fit. Ensure there is an even gap around all sides of the door for proper clearance.
Address Any Issues:
If the door doesn’t fit perfectly, address any issues immediately. Make adjustments to the frame, shimming, or leveling to achieve the desired fit.
Insulate and Weatherproof (for Exterior Doors):
Apply weatherstripping and insulation around the door frame to improve energy efficiency and weatherproofing.
Securely Install the Door:
Once you are satisfied with the fit, secure the door in place using the appropriate hardware, screws, and anchors.
Finishing Touches:
Apply trim and sealants as needed to complete the installation and ensure a neat and clean appearance.
By following these steps and taking the time to accurately measure and prepare the rough opening, you can ensure a perfect fit for your new door. A well-installed door will not only enhance the look of your home but also provide improved energy efficiency, security, and functionality. If you are unsure about the installation process, it’s always a good idea to seek professional assistance from a qualified contractor or installer.